Tuesday, August 27, 2013

How to Tell If Your Users are Connecting to the Availability Group Listener

You've spent a lot of time planning and building out a new SQL Server 2012 environment complete with Availability Group Listeners, but how can you be sure the end users are connecting to the listener and not directly to the SQL Server instance?

So why would we care about this?  To begin with, if the users are not connecting to the listener, then upon a failover to another replica, those users would have to connect to a different SQL Server instance name.  Having a single point of connection is crucial for the high availability process to work correctly.

In a previous blog post, we setup an Availability Group Listener, AdventureWorks.mcp.com, with two IP addresses:   192.168.1.55 & 192.168.2.55.  We'll use this one for our example.


The DMV, sys.dm_exec_connections, contains information about each connection to a SQL Server instance, and can be used to answer our question.

Open a TSQL connection to either the Availability Group listener, and execute the following command.

SELECT
     session_id
    ,local_net_address
    ,local_tcp_port
FROM sys.dm_exec_connections;
GO


The local_net_address and local_tcp_port columns will display the IP address and port number of the client's connection target.  This will be the connection string the users entered to connect to the SQL Server instance.

If the IP address and port number match the Availability Group IP, then you're in good shape.  If they do not match, then some users are likely connecting directly to the SQL Server instance, and that will need to be changed.

By joining the sys.dm_exec_sessions DMV, you'll also be able to get the hostname and program name of each connection.

SELECT
     ec.session_id
    ,es.host_name
    ,es.program_name
    ,local_net_address
    ,local_tcp_port
FROM sys.dm_exec_connections ec
    JOIN sys.dm_exec_sessions es ON ec.session_id = es.session_id;
GO


As you can see in this picture, we have one connection on session_id 62 that is connecting directly to the SQL Server instance and not the to the Availability Group Listener.  At this point, I would track down that user, and have them use the correct connection string.

Using this DMV will allow you to verify the users are connecting to SQL Server using the correct connection strings, and help prevent unneeded outages during a failover between replicas.

Monday, August 19, 2013

PASS Summit 2013 - You Ain't From Around Here Are Ya?

I know what y'all are thinkin', what's Charlotte got to do with SQL Server?  Just hear me out.  There's a lot more to Charlotte than NASCAR, fried chicken, and rednecks. I assume most of the 5000 attendees have never been to Charlotte, and probably don't know much about the area.  To help everyone out, I have made a list of useful tips.


My history and why you should listen to me. I begged my management for nearly a decade to send me to the PASS Summit, and this year they finally granted my request.  And to top it off even more, I just happen to live in Charlotte and work in the building right across the street from the Charlotte Convention Center.  I'm native to North Carolina and I have lived in Charlotte for about 17 years.  I even graduated from The University of NorthCarolina at Charlotte.

Queen City History. Charlotte is named in honor of Charlotte of Mecklenburg-Strelitz who was married to King George III of Great Britain.  This is why the city is nicknamed the "Queen City".  It is currently the 17th largest city in the US and it's the 2nd largest financial city, trailing only New York City. The city center is called uptown instead of downtown. The term downtown gives off a negative vibe; hence the term Uptown Charlotte.

Hotels. Just pick one, they're all about the same. However, if you are staying in a hotel on the south side of town near Pineville or Ballentyne, be prepared for I-77 and I-485 to be a parking lot during rush hour. Trust me on this one.

Transportation. The good news for anyone staying on the south side of town is the Lynx light rail. There is only one rail line but it runs from the center of town all the way south to Pineville. My suggestion is to take the light rail if it's near your hotel. Just get off at the 3rd St/Convention Center station, and the convention center is right across the street.


The CATS bus sytem is also not a bad option. The main transit center in uptown is only 3 blocks from the convention center. Any of the bus lines that end in an X are express routes (i.e. 54X) that pick you up from the commuter lots and head directly uptown. In uptown, there is a free bus line called the Goldrush. It different buses and only runs east/west along Trade Street.  It's helpful if you are staying in one of the hotels along that street.  And the best part is it's free.  Check out RideTransit.org for a complete system map.


If you like riding bicycles, the you'll want to check out CharlotteBcycle. There are about a dozen bicycle rentals around uptown. You just pay a small fee at the automated kiosk to share a bike, even if it's for a one way trip.


For those of you driving uptown, you'll need a place to park. There are over 40,000 parking spaces uptown, but you will have to compete with the daily workforce, like me. Most parking decks will run you about $15-20 per day. Once you get uptown, look for the giant "P" signs outside each of the parking decks. The signs will tell you the number of spaces available.


The parking lots are usually cheaper than the decks, $3-10 per day, and most of those you can pay by credit card at the kiosk. Some lots even allow you to pay using the Park Mobile app (Apple | Android | Windows). Just look for the Park Mobile sign near the kiosk for the lot number.


You might wonder what these over-street walkways are used for.  This is part of the Overstreet Mall.  It's a maze of walkways that interconnect some of the buildings and it's full of restaurants and shops.  Even if you're not interested in the shops, it's a nice way to get from building to building when it's raining.


While walking around uptown, you'll see these "You Are Here" street signs. The maps divide uptown four color-coded regions, North, South, East, and West. Each map provide you with information about attractions, hotels, and parking. 


Dining. You shouldn't have any issue finding a place to eat uptown; however, there are a few places of interest you should try out.  

For breakfast:
For lunch:
For dinner:
Also, if you're thinking of going to Ruth's Chris Steakhouse, then chose Sullivan's Steakhouse or Morton's Steakhouse instead.  I've never had a good experience at the uptown location, but that's just my opinion.

On a side note, when eating out, just keep in mind that you're in the south.  If you order iced tea, it WILL be sweet tea.  If you want unsweet tea, then ask for it.

Entertainment. There's plenty to do uptown as well as around town after the conference is over.  Next door to the convention center is the NASCAR Hall of Fame.  There are several other museums: Mint Museum, Bechtler Museum of Modern Art, etc.  The EpiCentre is a multi-use entertainment complex only 2 blocks from the convention center. There are restaurants, bars, and other entertainment there.  For beer lovers, there are plenty of bars uptown.  There are way too many to list, but a few are:
For wine lovers, check out Threes and The Wooden Vine.  Both have a wide range of selections.

The NC Music Factory is about 2 mile walk north from the convention center or only a 4 or 5 minute drive, but they do have free parking.  It's an entertain complex with live music, restaurants, bars, and even stand up comedy at The ComedyZone.  If you head over that way, be sure to visit the VBGB Beer Hall and Garden; definitely the best bar at the music factory.

Don't forget about the Carolina Panthers.  They'll have a home game on Sunday, October 20th at 1PM.  It might be your only chance to see the future superbowl champions in action!  

I know some of you might health nuts and would like find a place to workout besides your hotel gym.  The YMCA has a location uptown in my building.  $10 will get you a day pass, and $20 will get a 7-day pass.

If you prefer jogging outdoors, any of the streets uptown will work nicely.  However, if you like a little more scenery for your job, then head over to the Little Sugar Creek greenway.  The Charlotte Parks and Recreation built 35 miles of greenways around town.


This one is a beautiful, winding route nearly 6 miles long, and located just outside the south side of the I-277 belt loop uptown.


Finally, for the super adventurous attendees, the US National Whitewater Center is about 15 miles west of uptown, or head north to take a ride at 150mph at the Richard Petty Driving Experience.  It's only about 20 miles north of uptown at the Charlotte Motor Speedway.

As a bonus item, the very popular Showtime original Homeland is filmed right here in Charlotte.  If you have the time, why not try out as an extra for the show.

Other links with information about Charlotte:

I think I covered a lot, but if anyone has questions about Charlotte, please don't hesitate to contact me.

Tuesday, July 23, 2013

Are You the Primary Replica?

UPDATED -- Jul 3, 2015 -- To verify database exists, per comments by Konstantinos Katsoridis. Thanks for finding the bug!

In my recent adventures with AlwaysOn Availability Groups, I noticed a gap in identifying whether or not a database on the current server is the primary or secondary replica.  The gap being Microsoft did not provide a DMO to return this information.  The good news is the documentation for the upcoming release of SQL Server 2014 looks to include a DMO, but that doesn't help those of us who are running SQL Server 2012.

I've developed a function, dbo.fn_hadr_is_primary_replica, to provide you with this functionality.  This is a simple scalar function that takes a database name as the input parameter and outputs one of the following values.

 0 = Resolving
 1 = Primary Replica
 2 = Secondary Replica
-1 = Database Does Not Exist

The return values correspond to the role status listed in sys.dm_hadr_availability_replica_states.

In this example, I have setup 2 SQL Servers (SQLCLU1\SPIRIT1 and SQLCLU2\SPIRIT2) to participate in some Availability Groups.  I have setup 2 Availability Groups; one for AdventureWorks2012 and a second for the Northwind database.  SQLCLU1\SPIRIT1 is the primary for AdventureWorks2012 and secondary for Northwind.  SQLCLU2\SPIRIT2 is the primary for Northwind and secondary for AdventureWorks2012.

First let's run the function for both databases on SQLCLU1\SPIRIT1.


On this server, the function returns 1 because it's the primary for AdventureWorks2012, and returns 2 because it's the secondary for Northwind.

Now let's run it again on SQLCLU2\SPIRIT2.


As expected we get the opposite result.

This function does not take into account the preferred backup replica; it only returns information based on whether it is the primary or secondary replica.  It was created to use within other scripts to help determine a database's role if it's part of an Availability Group.  I hope this script can help you as well.

USE master;
GO

IF OBJECT_ID(N'dbo.fn_hadr_is_primary_replica', N'FN') IS NOT NULL
    DROP FUNCTION dbo.fn_hadr_is_primary_replica;
GO

CREATE FUNCTION dbo.fn_hadr_is_primary_replica (@DatabaseName SYSNAME)
RETURNS TINYINT
WITH EXECUTE AS CALLER
AS
/********************************************************************

  File Name:    fn_hadr_is_primary_replica.sql

  Applies to:   SQL Server 2012

  Purpose:      To return either 0, 1, 2, or -1 based on whether this 
                @DatabaseName is a primary or secondary replica.

  Parameters:   @DatabaseName - The name of the database to check.

  Returns:      0 = Resolving
                1 = Primary
                2 = Secondary
               -1 = Database does not exist

  Author:       Patrick Keisler

  Version:      1.0.1 - 07/03/2015

  Help:         http://www.patrickkeisler.com/

  License:      Freeware

********************************************************************/

BEGIN
    DECLARE @HadrRole TINYINT;

    IF EXISTS (SELECT 1 FROM sys.databases WHERE name = @DatabaseName)
    BEGIN
        -- Return role status from sys.dm_hadr_availability_replica_states
        SELECT @HadrRole = ars.role
        FROM sys.dm_hadr_availability_replica_states ars
        INNER JOIN sys.databases dbs 
            ON ars.replica_id = dbs.replica_id
        WHERE dbs.name = @DatabaseName;
    
        -- @DatabaseName exists but does not belong to an AG so return 1
        IF @HadrRole IS NULL RETURN 1;

        RETURN @HadrRole;
    END
    ELSE
    BEGIN
        -- @DatabaseName does not exist so return -1
        RETURN -1;
    END    
END;
GO

Tuesday, July 16, 2013

Setup an Availability Group with Multiple Subnets in VMware Workstation


Before we get started, I want to make it clear this is NOT how you would normally configure all these items in a production environment.  This is meant for a lab or demo area to play with Availability Groups over multiple subnets.

I use VMware a lot for demos at work as well as tooling around with various Windows and SQL Server related stuff.  In working with Availability Groups, one of the things I would like to do for my demos is have multiple subnets in VMware Workstation, so I can simulate a site failover.

Just to test Availability Groups requires at least three VMs; one for the Active Directory domain controller, one for the primary replica, and one for the secondary replica.  For this demo, we'll still just need those three VMs.

I'm not going to cover all the steps to setup an Active Directory domain controller or install SQL Server.  I'll assume you have already completed those steps on each of the VMs.  All three of my VMs are running Windows Server 2008 R2 Enterprise Edition.  If you are running a different version, then some of these screenshots could be different.

Here is the setup for each VM.

PDC
  1. Windows Active Directory Domain Controller (MCP domain)
  2. DNS server (mcp.com)
  3. Network Policy and Remote Access (used for routing)
  4. Connected to both 192.168.1.x and 192.168.2.x subnets

SQLCLU1
  1. SQL Server 2012 Enterprise Edition
  2. SPIRIT1 is the named instance listening on port 1433
  3. Connected to 192.168.1.x subnet

SQLCLU2
  1. SQL Server 2012 Enterprise Edition
  2. SPIRIT2 is the named instance listening on port 1433
  3. Connected to 192.168.2.x subnet

AdventureWorks2012AG
  1. Availability Group for the AdventureWorks2012 database
  2. Listening on port 1433
  3. Mapped to 192.168.1.55 and 192.168.2.55

Now that you see how the finished environment is setup, let's see how to get there.

The first thing we need to do is setup each of the custom networks.   From the VMware Workstation menu, open the Virtual Network Editor.  Click on "Add Network" and select VMnet2.  Select Host-only and uncheck both the "Connect to Host Virtual Adapter" and "Use local DHCP" options.  Set the subnet IP to 192.168.1.0 and the subnet mask to 255.255.255.0.

Click "Add Network" and select VMnet3.  Make all the same setting changes, but this time set the subnet IP to 192.168.2.0. 


On the VM that is your Active Directory Domain Controller (PDC):

Edit the settings of the VM.  Make sure you have only ONE network card, and assign it to VMnet2.


Power on your VM domain controller.  Once it's up, edit the IPv4 settings of your network card.  Since we're not using DHCP, we'll need to hard code the IP address.  I have my domain controller IP set to 192.168.1.50.  You can set yours to any IP as long as it's on the same subnet.  Set the subnet mask to 255.255.255.0 and then leave the gateway blank.  Set the preferred DNS server to 192.168.1.50, because this is also your DNS server.  Save the changes and then shutdown the VM.


Edit the settings if the VM, add a 2nd network card and assign it to VMnet3. 


Power on the VM.  Once it's up, edit the IPv4 settings of the new network card.  This time set the IP to 192.168.2.50, the subnet mask to 255.255.255.0, and the Preferred DNS server to 192.168.1.50. Save the changes.


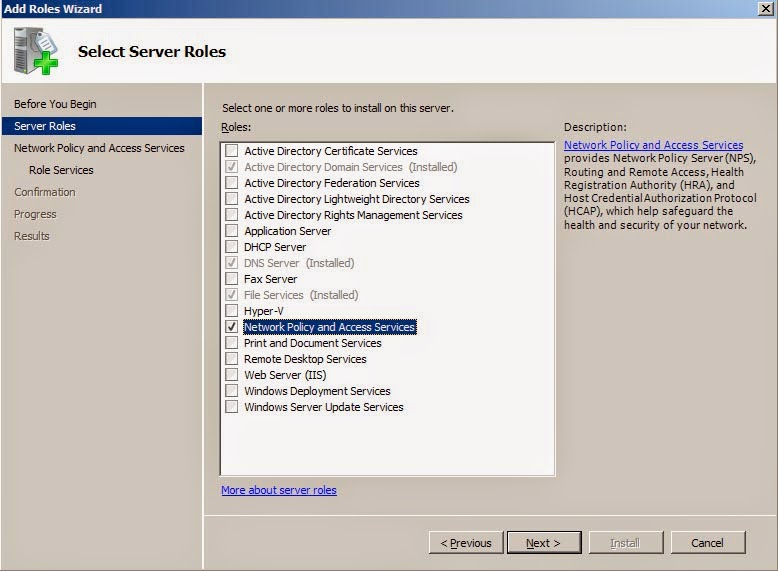
Your PDC will act as a router between the two subnets, but it will need software to make it happen.  Open Server Manager, select roles, and then "Add Role".  Select "Network Policy and Access Services".


For the service role, select "Routing".  It will automatically select the other required services.


Click next and then install. Once the installation is complete, go to Administrative Tools and open "Routing and Remote Access".  Right click on the domain controller and select "Configure and Enable Routing and Remote Access".   From the wizard, choose "Custom Configuration" then click Next.  Select "LAN Routing" then click next to complete the configuration. 


When a pop up asks to start the service, click "Start Service".  Once the configuraiton is complete, you now have software routing enabled on your domain controller.  The routing should be automatically configured between the two subnets. 


You would normally use a hardware router for this job, but the Routing and Remote Access service functions just fine for a lab running on VMware.  The next step is to configure the network and IP settings for each of our SQL Servers. 

On the first SQL Server VM (SQLCLU1):

Open the VM properties and make sure your network card is assigned to VMnet2. 


Save the settings and then power on the VM.  Once it's up, edit the IPv4 settings of the network card.  Set the IP address to 192.168.1.51.  Set the subnet mask to 255.255.255.0 and the default gateway to 192.168.1.50.  The default gateway needs to be the IP address of the server that is running the Routing and Remote Access service.  In this case, it's the IP of the domain controller.  Set the Preferred DNS server to 192.168.1.50.  Click OK to save the settings.


Additionally, you will need to open firewall ports TCP 5022 for the HADR service, TCP 1433 for the SQL Server service, and UDP 1434 for the SQL Server Browser service.

On the second SQL Server VM (SQLCLU2):

Open the VM properties and make sure your network card is assigned to VMnet3. 


Save the settings and then power on the VM.  Once it's up, edit the IPv4 settings of the network card.  Set the IP address to 192.168.2.52.  Set the subnet mask to 255.255.255.0 and the default gateway to 192.168.2.50.  The default gateway needs to be the IP of the 2nd network care we setup earlier on the domain controller.  Set the Preferred DNS server to 192.168.1.50.  Click OK to save the settings.


Additionally, you will need to open firewall ports TCP 5022 for the HADR service, TCP 1433 for the SQL Server service, and UDP 1434 for the SQL Server Browser service.

Your two subnets should be working now.  If you want to test it, just open a command prompt from SQLCLU1 and issue a "PING SQLCLU2".  You can do the same test from SQLCLU2.


Setting up the Windows Cluster

Open Failover Cluster Manager and click "Create a Cluster".  Step through the setup wizard by selecting the two cluster nodes: SQLCLU1 and SQLCLU2. 


Key in the name of the cluster, SQLCLUV1.  Select the 192.168.1.0/24 subnet and enter the IP address of 192.168.1.54.  Make sure to uncheck the other subnet.  Click next to finish the setup.


At this point we would normally configure the quorum; however, since this is just for a lab setup, we'll leave the quorum set to Node Majority.  When setting this up in a production environment, you'll want to configure the quorum based on the number voting nodes.  This link will guide you through what changes are needed.

Look at the settings of each of the cluster networks.  Cluster Network 1 is the 192.168.1.x subnet and is connected to SQLCLU1. 


Cluster Network2 is the 192.168.2.x subnet and is connect to SQLCLU2.


Setting up the Availability Group

Now comes the easy part.  First we'll need to enable the Availability Group feature on each SQL Server instance.  On SQLCLU1, open the SQL Server Configuration Manger.  Right click on the SQL Server service and select properties.  Select the "AlwaysOn High Availability" tab, and check the box to enable it.  Click OK to save the changes, and then stop and restart the SQL Service services. 


Make the change on the second SQL Server, SQLCLU2.

Now make sure the AdventureWorks2012 database is in FULL recovery mode.  Within SQL Server Management Studio we'll setup the Availability Group for the AdventureWorks2012 database.  Open Object Explorer to SQLCLU1\SPIRIT1. Right click on the "AlwaysOn High Availability" node and select "New Availability Group Wizard".  Enter a name for the group, AdventureWorks2012AG and click next.


Check the box next to the AdventureWorks2012 database and click next.


Click Add Replica and add SQLCLU2\SPIRT2 to the list of replicas.  Check all the boxes for Automatic Failover and Synchronous Commit.


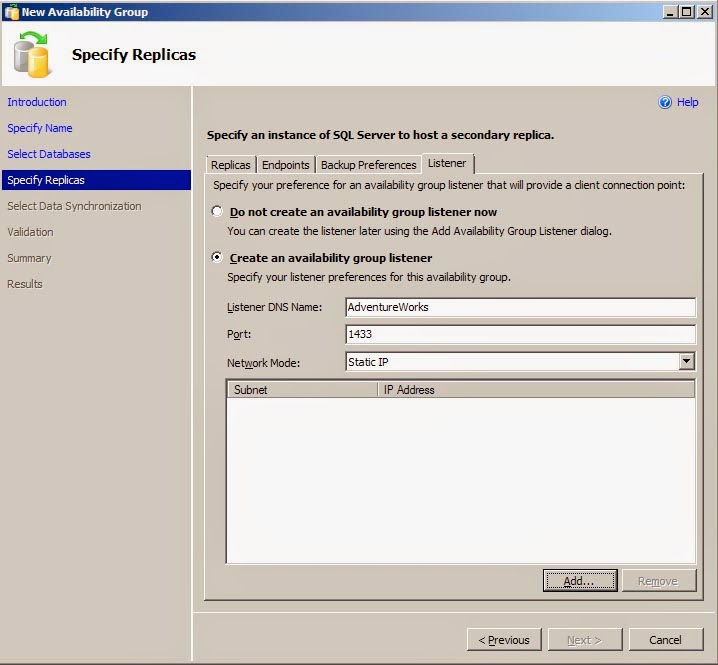
Click the Listener tab.  Select the "Create an Availability Group Listner" radio button, then enter a listener name and port number and make sure Static IP is selected for Network Mode.


Click the Add button.  Select the 192.168.1.0/24 subnet and enter the IP of the listener, 192.168.1.55, then click OK.


Click the Add button again.  Select the 192.168.2.0/24 subnet and enter the second IP of the listener, 192.168.2.55, then click OK.  You should now see 2 separate IP address for the listener.  Click Next to continue.


Select FULL data synchronization and specify a backup file share, \\SQLCLU1\BACKUP, and click next.  The file share is only needed to complete the initial data synchronization.


Verify all the validation checks are successful and then click next.  Click finish to complete the Availability Group setup.

Once the setup is complete, go back into Failover Cluster Manager to check out the Availability Group resource that was added.  What you'll notice is two IP addresses associated to the Availability Group listener.  One is currently online and the other is offline.  The IP that's online is associated to the subnet that SQLCLU1 is on, because it's currently the primary replica.


Now let's failover the Availability Group to SQLCLU2\SPIRIT2 to see what happens to the listener.  Open a query window to SQLCLU2\SPIRIT2 and run the following code.

ALTER AVAILABILITY GROUP AdventureWorks2012AG FAILOVER;

Once the failover is complete, go back into Failover Cluster Manager to check out the properties of the Availability Group.  You'll notice the IP resources have switched.  The IP 192.168.1.55 is offline and 192.168.2.55 is online.


SQLCLU2\SPIRIT2 is now the primary replica for the Availability Group and it's on the 192.168.2.x subnet.  You can also go back to the domain controller and open up the DNS Manager.  There you will see the two DNS entries for the the Availability Group listener; one for each IP address.


What we've covered here is a quick and easy way to setup an Availability Group on multiple subnets within VMware Workstation.  Remember this is not how you would normally setup everything within a production environment.  In a production environment we'd use a hardware router instead of the routing service, the separate subnets would likely be in different data centers, and the quorum would be configured according the number voting nodes.  However, this provides you with a platform for doing multisubnet failovers with Availability Groups.

Tuesday, June 25, 2013

VMware vSphere Storage Performance - Thick vs Thin Provisioning

Industry experts will tell you that virtualization of your environment is not done to improve performance, it's done to make it cheaper and easier to manage.  The task of most VM administrators is to cram as many VMs into a farm as possible.  One of the ways is to accomplish that is to allocate "thin provisioned" storage to each VM.

For each VM that is created, the VM admin has to specify the number of virtual CPUs, the amount of virtual RAM, the number and size of each virtual disk, as well as a few other items.  The virtual disks can be allocated in two different ways: thin provision or thick provision.  The difference between thick and thin is very simple and outlined in this diagram from VMware.


Thick provisioned storage allocates all storage when the disk is created.  This means if a VM admin allocate 25GB for a virtual disk, then VMDK file on the host is actually 25GB. 

Thin provisioned storage allows the VM admin to essentially over allocate storage, much in the same way they can over allocate memory.  For example, if a VM admin allocates 25GB for a virtual disk, then the VMDK file will start out at a few MB then grow as the space is used by the VM.  However, within the VM, the Windows operating system will see the disk as having a total capacity of 25GB.

Below, you can see Windows shows both Drive E and F as 25GB in size.


However, vSphere shows the thick provisioned disk (Drive E) as 25GB, but the thin provisioned disk (Drive F) is 0GB.


VMSTORAGETEST_4-flat.vmdk is the thick provisioned disk (Drive E).
VMSTORAGETEST_5-flat.vmdk is the thin provisioned disk (Drive F).

Thin provisioning is a great concept for using only what you need, and not allowing you waste valuable storage.  However, this can have a detrimental effect on database performance.  Thin provisioned disk will auto grow the VMDK file as the VM needs more space on that disk.  When VMware needs to grow the VMDK file, it will cause a delay in the VM's disk access while it's growing.  Let's take a look at a few examples.

Example 1 - File copy from within Windows

In this test, we'll use ROBYCOPY to copy a 20GB folder from the C drive to the thick provisioned disk (Drive E).

ROBOCOPY C:\SQL E:\SQL *.* /E /NFL /NDL /NJH

Copy time of 4 min 24 sec at a rate of 82MB/sec.


Now let's do the same copy to the thin provisioned disk (Drive F) and compare the results.

ROBOCOPY C:\SQL F:\SQL *.* /E /NFL /NDL /NJH

Copy time of 5 min 01 sec at a rate of 73MB/sec.


Windows is getting nearly 10MB/sec faster copy times to the thick provisioned disk (Drive E).

Example 2 - Database backup to disk from SQL Server

In this test, we'll backup a database to each of the disks and compare the runtimes.

First, we'll backup to the thick provisioned disk (Drive E).

BACKUP DATABASE AdventureWorks2012
TO DISK = 'E:\AdventureWorks2012.BAK' WITH INIT;
GO

Processed 449472 pages for database 'AdventureWorks2012', file 'AdventureWorks2012_Data' on file 1.
Processed 2 pages for database 'AdventureWorks2012', file 'AdventureWorks2012_Log' on file 1.
BACKUP DATABASE successfully processed 449474 pages in 74.125 seconds (47.372 MB/sec).

Now backup to the thin provisioned disk (Drive F).

BACKUP DATABASE AdventureWorks2012
TO DISK = 'E:\AdventureWorks2012.BAK' WITH INIT;
GO

Processed 449472 pages for database 'AdventureWorks2012', file 'AdventureWorks2012_Data' on file 1.
Processed 2 pages for database 'AdventureWorks2012', file 'AdventureWorks2012_Log' on file 1.
BACKUP DATABASE successfully processed 449474 pages in 83.285 seconds (42.162 MB/sec).

As you can see, we're seeing similar results that we saw in our earlier test.  Within SQL Server we're getting about 5MB/sec faster backup times. 

After running these tests, we can look back in vSphere to see the new size of the VMDK file for our thin provisioned disk (Drive F).  You'll see the VMDK is now showing over 24GB of used space for that file.


These simple tests reveal that thin provisioning storage within VMware can indeed impact performance.  This doesn't mean that you should thick provision storage on every VM, but it does show you how this configuration can affect Windows and SQL Server.  You can equate this to the data/log file auto grow feature within SQL Server; you should right-size the virtual disk from day one the same way you should right-size your database files from day one.  As I stated earlier, virtualizing your SQL Servers is done to make things cheaper and easier to manage, not to make them perform better.