Tuesday, November 17, 2015

Create a Whitelist for SQL Server

UPDATED - May 16, 2017 - Please review the updated code here.

In my previous post, Configuring the Azure SQL Database Firewall, I discussed how you can configure the firewall rules to manage access to the SQL Server. Today, I wanted to demonstrate how you can accomplish the same thing with your on-premise SQL Servers by creating a whitelist.

So let’s start off by defining “whitelist”. According to the American Heritage Dictionary, it is “a list of people or organizations that have been approved to receive special considerations”. In our example, that “special consideration” is access to the SQL Server only if your workstation IP address is on the whitelist.

So why would we care about this? Why not just manage access to SQL Server the normal way with logins and passwords. Here is one example. Let’s say you have a company policy that prohibits anyone from using a common login to connect to a SQL Server. But your application uses a single SQL login to make its connection to SQL Server, and EVERY developer in the company knows the password. Even though there is a written policy in place, what would prevent one of those developers form connecting to SQL Server to fix a bug, or worse, change data to circumvent the application logic.

A whitelist will define which logins are allowed to connect to SQL Server from a specific IP address. Using our scenario from above, we can walk through an example. First we need to create the whitelist table to enforce this policy: the application login (WebSiteLogin) should only be allowed to connect to SQL Server if it originates from the web server’s hostname (webserver1) and IP address: 192.168.100.55.

USE master;
GO

IF OBJECT_ID('dbo.WhiteList') IS NOT NULL
    DROP TABLE dbo.WhiteList;
GO

CREATE TABLE dbo.WhiteList
(
     Id INT IDENTITY(1,1) PRIMARY KEY
    ,LoginName VARCHAR(255)
    ,HostName VARCHAR(255)
    ,HostIpAddress VARCHAR(15)
);
GO

Next, we need to add an entry to allow access.

INSERT dbo.WhiteList(LoginName,HostName,HostIpAddress)
SELECT 'WebSiteLogin','webserver1','192.168.100.55';
GO

Just creating the whitelist does nothing. That’s why we need to use a logon trigger to enforce the whiltelist rules.

CREATE TRIGGER WhiteListTrigger
ON ALL SERVER FOR LOGON
AS
BEGIN
    DECLARE 
         @LoginName varchar(255) = ORIGINAL_LOGIN()
        ,@HostName varchar(255) = HOST_NAME()
        ,@HostIpAddress varchar(15);

    SELECT @HostIpAddress = client_net_address 
    FROM sys.dm_exec_connections
    WHERE session_id = @@SPID;

    IF 
    (
        SELECT COUNT(*) FROM dbo.WhiteList
        WHERE 
        (
            (LoginName = @LoginName) OR (LoginName = '*')
        )
        AND
        (
            (HostName = @HostName) OR (HostName = '*')
        )
        AND
        (
            (HostIpAddress = @HostIpAddress) OR (HostIpAddress = '*')
        )
    ) = 0
    ROLLBACK;
END;
GO

The logon trigger simply compares the user’s login name, hostname, and IP address to what’s in the WhiteList table. If there is a match, then access is allowed. If not, then the connection is terminated via a rollback. To test this, we can attempt to login using WebSiteLogin from an IP address other than 192.168.100.55.


Immediately, we are greeted with a logon error message.


In addition to comparing the logins, the code also adds a wildcard option using the asterisk (*).

SELECT * FROM dbo.WhiteList;
GO


Line 1 has an asterisk for LoginName and HostIpAddress. This means that any login from any IP address is allowed to connect as long as the HostName is dbserver. Line 2 has an asterisk for HostName and HostIpAddress. This means the sa login is allowed to connect from any hostname or IP address. Line 3 is the example we used above. An asktrisk in all three columns would allow any login from any hostname or IP address to connect.

In the event you lock yourself (or everyone) out of the SQL Server, there is a quick way to restore access. You’ll need to connect to SQL Server using the Dedicated Admin Connection, either through Management Studio or the SQLCMD command line using a login with SysAdmin permission. Once connected, you can disable the logon trigger.


From the example above, you can see how quickly you can implement your own firewall for your on-premise SQL Servers using a whitelist and a logon trigger.

Additional resources about Logon Triggers:
https://msdn.microsoft.com/en-us/library/bb326598.aspx

Tuesday, November 3, 2015

Configuring the Azure SQL Database Firewall

Azure SQL Database is a Platform as a Service (PaaS) that provides a relational database for use over the internet. That sounds super cool and easy to use. But wait, there’s one word I’d like to highlight in that first sentence: “internet”. Anyone with an internet connection could access your database. Now that’s no cool. So how does Microsoft keep your database safe? The answer is a multipronged approach of using encryption, authentication, authorization, and firewalls.

Continue reading...

Friday, October 16, 2015

A New Achievement

To celebrate a recent achievement, I have decided to create a whole new section to my blog that will be dedicated to the subject. Please follow the link to learn more.

Continue reading...

Wednesday, October 14, 2015

Speaking at SQL Saturday #452 - Charlotte, NC - October 17

In case you missed it last week, there will be another SQL Saturday this weekend in Charlotte, NC. If you are in the area, please come out to this free training event to hear a bunch of great professionals talk about SQL Server. You can register for the event here: http://www.sqlsaturday.com/452/eventhome.aspx.

I will be presenting one session on Performance Monitoring Tools.

No Money for Performance Monitoring Tools? No Problem!
So you like the idea of using one of the commercially available performance monitoring tools but can’t convince your boss to spend the money? Then join me as we explore some absolutely free tools born right out of Microsoft’s customer support teams: DiagManager and SQLNexus. We will see just how easy it is to use them to collect and analyze performance data from your SQL Servers. These tools can get you started quickly without having to deal with the red tape.


Wednesday, October 7, 2015

Speaking at SQL Saturday #445 - Raleigh, NC - October 10

I will be speaking this weekend at SQL Saturday #445 - Raleigh, NC. If you are in the area, please come out to this free training event to hear a bunch of great professionals talk about SQL Server. You can register for the event here: http://www.sqlsaturday.com/445/eventhome.aspx. So come on out and meet some great people who might be able to help you solve your worst problems.

I will be presenting two sessions on Policy Based Management and Performance Monitoring Tools.

Policy Based Management - Beyond the Basics
Policy Based Management is a great feature of SQL Server and easy to implement; however, for most organizations you need a way to customize it to your enterprise. Join me for this session as we take a deeper dive into PBM to see how you can customize polices, evaluate those polices across your entire enterprise environment, track those changes over time, and deliver reports to management showing your progress.

No Money for Performance Monitoring Tools? No Problem!
So you like the idea of using one of the commercially available performance monitoring tools but can’t convince your boss to spend the money? Then join me as we explore some absolutely free tools born right out of Microsoft’s customer support teams: DiagManager and SQLNexus. We will see just how easy it is to use them to collect and analyze performance data from your SQL Servers. These tools can get you started quickly without having to deal with the red tape.

Tuesday, July 21, 2015

PSSDiag Configuration Manager – A Companion for SQLNexus

Have you ever called Microsoft Customer Support for help with a SQL Server performance issue? The engineer will typically send you a self-extracting exe file with instructions to unzip the file on the server and run the pssdiag.cmd file to collect data while you reproduce your issue. Afterwards, you’re supposed to zip up the contents of the output folder and send it back to the engineer. How did the engineer compile that collection code so quickly? The answer is PSSDiag Configuration Manager, or simply DiagManager.

DiagManager is just a tool that you use to configure which performance items are to be collected by the SQLDIAG utility. The configuration files that come with SQLNexus (see my previous post) can be edited by hand, but sometimes it is much easier to use a GUI, and that’s where DiagManager can help you.

Version 12.0.0.1001 is the latest and to get it installed, just download it from codeplex and run SetupX86.msi. Go to the Start Menu and click on PSSDiag Configuration Manager to launch the program. Initially, you’ll get a warning screen to remind you the SQL client tools are required to run the collector. Just click OK to continue.


The first thing you’ll likely notice is a line of tabs across the top for different versions of SQL Server. Even though there are tabs for SQL Server 7.0 and 2000, they are no longer supported by this tool. If you really need a collection tool for those old version, then follow this link. But on the bright side, this latest version supports up to SQL Server 2014.

To get started using DiagManager, choose your version of SQL Server by selecting a tab.


Next, select the type of processor that your server has; for example, Intel or AMD. Itanium-based processors are no longer support for current versions of SQL Server. My server uses AMD processors, so I’ll need to click the AMD button.


Now you will need to enter the Machine name and the Instance name that will be monitored. The default values “.” and “*” will capture data for all SQL Server instances on the local machine. Typically for troubleshooting you won’t need to capture data for all instances. If your SQL Server installation is running on a Windows Failover Cluster, then you need to enter the SQL Server Virtual Name and not the physical host name. You’ll also need to specify the credentials used to connect to SQL Server. In my example, I’ll be monitoring a stand-alone instance named TRON\SQL2012 and connecting using Windows Authentication.


The section below that contains the Machine-wide Diagnostics are the counters you would normally see in Performance Monitor. All of the counters for SQL Server are checked by default as well as several for the Windows OS. At this point, you can add or remove counters that you want to capture. You can also specify the max file size (in MB) as well as the collection interval. The fault values are 256MB and 5 seconds.


Unchecking the Perfmon box will disable the collection of all perfmon counters.


The three check boxes above the perfmon box are for the Windows Event Logs. By default, DiagManager will only grab the event logs when SQLDIAG is shutdown; however, you can check the Startup box and it will grab them at both startup and shutdown. This is helpful if you need to do a before after comparison of the Windows Event logs. The collected data will be saved in the output folder as comma-separated (CSV) files. Unchecking the Event Logs box will disable the collection of the event logs.


In the top right half of the window, you will see Instance-specific Diagnostics; aka SQLDIAG and SQL trace. By default, SQLDIAG will only collect its data at shutdown, but you can check the Startup box to get before and after collections. This works the same as the event log collection. If you want to see the TSQL code that is used to generate this output, then just open the MSDiagProcs.sql file in Management Studio. Unchecking the SQLDIAG box will disable the collection of the SQLDIAG data.


Below SQLDIAG, you will see three tabs: Database Engine, Analysis Services, and XEvent. The Analysis Services tab is disabled for the public version of DiagManager, and in the current version, the XEvent tab should not be used to collect database engine data. This leaves the Database Engine tab, which is controls the events that will be captured using a SQL Trace. If you have ever used SQL Profiler to create a trace, then you should be very familiar with these options. Simply browse through the list to check or uncheck the items you need to collect.


Above the list of trace events, you will see a Trace checkbox and two dropdown lists. Unchecking the Trace box will disable the collection of any trace data. The “Max file size” dropdown just controls how large the trace files will get before they rollover. The default is 350MB. The Template dropdown list is a way to quickly check/uncheck events that will be collected. There are three templates included: General Performance, Details Performance, and PSSReplay. The PSSReplay is similar to the replay template within Profiler. General vs Details events is basically batch-level events vs statement-level events. The coolest thing about the trace templates, is that you can create your own. To do so, navigate to the TraceTemplates folder in the DiagManager install folder (C:\Program Files (x86)\Microsoft\Pssdiag\TraceTemplates). Open the folder that matches your SQL version, and make a copy of one of the XML files. Open that cop in your favorite XML editor and just change the “enabled” value to “true” for the events to collect and “false” for the events you do not want to collect, and then save the XML file.


The next time you open up DiagManager you should see your custom template in the dropdown list.


One big word of caution; a SQL Trace will cause the HEAVIEST overhead to your SQL Server, so be careful what items you choose to capture. If you are worried about adding too much overhead to your SQL Server, then consider using the “XEvent Batch_RPC Only” option in the Custom Diagnostics section. Checking this option will create an Extended Events session that will only capture “rpc_completed” and “sql_batch_completed” events. An Extended Events sessions adds far less overhead than a SQL Trace, but DO NOT enable both the SQL Trace box and the XEvent Batch_RPC option. Doing so would run both a trace and xevent session and add a lot of overhead to your SQL Server.

For the other items in the Custom Diagnostics section, you can select each one to see a description of what they do in the Instructions window. For example, the SQL 2012 Perf Stats script will gather data from DMVs about various items such as: top N queries, missing indexes, statistics, and even Availability Group info.

The Custom Diagnostics section is exactly as it sounds. You can create your own TSQL scripts or other types of custom collectors. Navigate to the CustomDiagnostics folder in the DiagManager install folder (C:\Program Files (x86)\Microsoft\Pssdiag\CustomDiagnostics), and create a new folder a new folder for your custom code. In my example, I created a folder called “SQL Database List” and added three files to the folder.


The first is just a TSQL script that has one command: “SELECT * FROM sys.databases;”. The DatabaseList.cmd is a Windows batch file that calls sqlcmd.exe and runs the DatabaseList.sql file.


The CustomDiag.XML file was copied from another custom folder and edited to reference the TSQL file and define whether it runs at startup or shutdown.


Once you have your custom collector created, close and open DiagManager and you should see your custom collector in the Custom Diagnostics list.


My example just captures a list of the databases, but you could easily create a script that captures data internal to one of your application databases.

Now that you have finally selected all the items that you want to collect, click the Save button at the top of the window. A Save Configuration window will pop up asking you what and where to save the collector files.


The Filename filed is where you want to save the PSSDiag.XML configuration file as well as all the collection scripts and tools. The option to create a CAB file is where DiagManager will compress and save all the files and scripts from the top folder. The CAB file is just a compressed (ZIP) file, and makes it easier to copy your collection tools to a remote server where the CAB file can then be uncompressed.

The last option available in DiagManager is the ability to compare PSSDiag.XML files. Just click the “Compare Config Files” button at the top of the window.


In the popup window, just select the two XML files that you want to compare, click the Compare button, and the output will be shown below.


Once you have created your collection set and/or the CAB file. All you need to do is copy the CAB file to the server to be monitored and execute the pssdiag.cmd batch file.


It will open a command prompt window and kick off each of the collection items you specified. Once you see the message “SQLDIAG Collection started” in green-colored font, then you can go recreate your performance issue.


Once you are ready to stop the collection, just press Ctrl+C. All of the data collected will be placed in the output folder, including any custom scripts that you may have created. That output folder can then be copied back to your workstation and fed into SQL Nexus for analysis. See my previous post for a detailed tutorial.

DiagManager definitely has a lot of configuration options to choose from, so learning which ones to use might take time. A good way to get started it is turn off all options except for one, and then run the data capture. Then you can look at the results in the output folder to really understand what that option does.

DiagManager, as well as SQLNexus, was created by the support teams at Microsoft, and they have made both of them freely available to the public to help in troubleshooting issues, so there’s no excuse not to try them out. I hope this tutorial will help you get started.

Tuesday, July 7, 2015

Use Trace Flag 902 to Recover from a Cumulative Update Failure

Recently, I ran into a critical error while I was helping a customer troubleshoot an issue in SQL Server. That may not sound like a big deal, but we were installing Cumulative Update 6 for SQL Server 2012 SP2 to fix our initial problem when we encountered the following error.


What gives SQL Server? We just upgraded several other instances on this same server. Why does this one have to fail right now? Well, a quick peak in the errorlog sure points me in the right direction.

Starting execution of SSIS_HOTFIX_INSTALL.SQL
:
:
Error: 9002, Severity: 17, State: 4.
The transaction log for database 'SSISDB' is full due to 'ACTIVE_TRANSACTION'.

Error: 912, Severity: 21, State: 2.
Script level upgrade for database 'master' failed because upgrade step 'SSIS_hotfix_install.sql' encountered error 3602, state 251, severity 25. This is a serious error condition which might interfere with regular operation and the database will be taken offline. If the error happened during upgrade of the 'master' database, it will prevent the entire SQL Server instance from starting. Examine the previous errorlog entries for errors, take the appropriate corrective actions and re-start the database so that the script upgrade steps run to completion.

Error: 3417, Severity: 21, State: 3.
Cannot recover the master database. SQL Server is unable to run. Restore master from a full backup, repair it, or rebuild it. For more information about how to rebuild the master database, see SQL Server Books Online.

SQL Server shutdown has been initiated.

This is definitely not good. Here we are trying to apply CU6 to fix one problem, and it we get another one in return. Needless to say, the CU6 upgrade failed, and SQL Server was dead in the water. Restarting the SQL Server service will just continue to run the internal upgrade and return the same error message.

It’s easy to see the root cause of the problem; the transaction log for the SSISDB database is full. But if we can’t start the service how will we ever get the error fixed? Lucky for us, Microsoft has a trace flag for that. Trace Flag 902 will bypass the internal upgrade script on startup. Just open SQL Server Configuration Manager and add -T902 to the Startup Parameters, save the changes, and then start the service.


SQL Server started up just fine and fully recovered all databases; including SSISDB. However, there was a warning about 1 transaction being rolled back for SSISDB.

1 transactions rolled back in database 'SSISDB' (5:0). This is an informational message only. No user action is required.

This is most likely from the SSIS_HOTFIX_INSTALL.SQL script that failed during the upgrade. Next, we need to check the configuration and the file sizes of the SSISDB database. Sure enough, the log file is still at its original size of 1MB with autogrowth was disabled.


For now, we can enable autogrowth for the log file and then save the changes. Next, we'll need remove the T902 trace flag from the Startup Parameters, and then restart the SQL Server service. Finally, SQL Server was able to startup without any errors. In the errorlog we can see the internal upgrade script ran successfully.

Starting execution of SSIS_HOTFIX_INSTALL.SQL
Start applying SSIS_HOTFIX_INSTALL changes.
:
:
Schema build in SSISDB has been updated to 11.0.5592.0
Execution of SSIS_HOTFIX_INSTALL.SQL completed

At this point, we need to rerun the CU6 setup again, so it can verify everything was correctly installed.


It shows the current patch level at 11.2.5592.0, which is correct, but the status is “Incompletely installed”. Just click next to continue with the upgrade to clear out the previous install failures.


So what is the lesson learned from this error? Should we leave autogrowth enabled on all databases before running a patch? Not necessarily, but it is an option. I think a better option is to keep a mental note of Trace Flag 902. With that trace flag, we were able to get SQL Server online long enough to correct the root problem, and we didn’t have to worry about changing any settings on a database.

References:


Tuesday, June 23, 2015

Exams 70-457 & 70-458 - Transition Your MCTS on SQL Server 2008 to MCSA: SQL Server 2012

This past week I finally completed the 70-458 exam to upgrade my certification to MSCA: SQL Server 2012. I never thought it would take me over a year to pass two upgrade exams, but sometimes life just gets in the way. I will say this is probably the hardest SQL Server exam I've taken so far.

The format of the upgrade exam is to combine questions from the three standard MCSA SQL Server 2012 exams, 70-461, 70-462, and 70-463. My hardest problem was dealing with the data warehouse questions; mainly the ones around Data Quality Services, Master Data Services, and especially the Project Deployment Model. I had never touched DQS or MDS before studying for this exam, and I can guarantee you that I would not have passed it without studying those topics. I found both to be very interesting features, but I have yet to come across a client that is using them.

The Project Deployment Model is a new concept for SSIS, and I really love it. I have worked with SSIS ever since it was introduced in SQL Server 2005, and this is a major improvement over the previous versions. Gone are the days when you had to design your own configurations for different environments or database connection strings. Everything is built into the SSIS catalog. The new features are awesome, but again, I had to really, really study the new deployment model and how to create packages that use environment variables.

All in all, I think it was a good test of SQL skills. Now let's see if I can pass the 70-459 before the end of the year.

Tuesday, April 28, 2015

Use PsPing When Working in Azure IaaS

Recently I’ve been learning more about how Azure functions and how it can help my customers. One of the best ways for me to learn about Azure was to build out my own environment using VMs, or Infrastructure as a Service (IaaS). All of that was easy; however, once the VMs were built I soon learned that Azure functions differently than an On-Premise solution.

The most basic network connectivity test that administrator use is the PING command. It is part of the ICMP protocol, but it’s disabled by default on each VM that I deployed. While it was easy enough just to configure the Windows Firewall to allow that traffic through, I decided to search for an alternative.

I found PsPing from SysInternals. It performs the same functionality as PING, but it uses the TCP protocol instead. When working in Azure, it can give you the same functionality without having to reconfigure your VMs.

For example, when I setup a SQL Server instance on one VM, I had difficulty establishing a connection to it from another VM. The standard PING proved to be useless, but PsPing proved its worth. By specifying the server name and a port number, I was able to successfully connect directly to the port number that SQL Server was listening on.


Immediately, I could see the benefit of using this new tool for more than just testing SQL Server connectivity. I can use it to specify any port number for any service. For example, I could ping port 80 if I’m testing a website, port 21 if it were an FTP server, or port 23 for telnet.

As I dig deeper into Azure, I’m sure I will discover many other new utilities that I can add to my own toolbox.

You can download PsPing from here.

Tuesday, March 10, 2015

SQL Nexus Might Just Save Your Bacon

The year is 2015, and I’m still surprised by how many people have never heard of SQL Nexus; although it has been available since approximately 2008. SQL Nexus is a tool that that is designed to collect and analyze data to help you troubleshoot SQL Server performance issues. There are plenty of tools on the market that can easily do this, but this one is free and it can be used to monitor SQL Server 2005 through SQL Server 2014. The tool was originally created by the SQL Server product support team, and is still used today as the primary tool for collecting and analyzing performance issues.

SQL Nexus does not require you to install anything on the server that you intend to monitor, but you will need to copy some data collector files to it. The collector files just run SQLDIAG and some other TSQL scripts to collect data from your monitored server. Below is a list of some of the data that is collected.
  1. Windows Performance Monitor counters
  2. Windows event logs (system, application, and security logs)
  3. Windows configuration settings
  4. SQL Server trace events
  5. SQL Server wait stats
  6. SQL Server blocking info
  7. SQL Server configuration settings
  8. SQL Server dump files
Once the data is collected from the monitored server, you copy all the data files back to another machine for analysis within SQL Nexus.

Installation & Setup
There are a few requirements to setting up SQL Nexus. First, make sure you have the .NET Framework 4.0 installed. Next, SQL Nexus requires an instance of SQL Server to store and analyze the imported data. Ideally, you would put it on a TEST server, but you can also use SQL Server Express Edition running on your workstation. If your workstation that will do the analysis is running SQL Server 2008 or SQL Server 2008 R2, then download and install the Microsoft Report Viewer 2010 control. If your workstation is running SQL Server 2012 or higher, then you can skip this step. Regardless of the version, download and install the Report Viewer hotfix. The hotfix addresses some bugs that will prevent some of the SQL Nexus reports from working properly.


Next, download and install the RML Utilities.


Now that you have all the prerequisites installed, download the latest version of SQL Nexus from the CodePlex website. Just uncompress the Release4.0.0.64.ZIP file and place on your desktop. Within the Release4.0.0.64 folder, you should see a subfolder called DataCollectors, and another compressed file called SqlNexus4.0.0.64.ZIP. Uncompress that zip file and place it on your workstation C drive. The SqlNexus4.0.0.64 folder will contain the SQL Nexus executable and all the other files needed to analyze the collected data. From there, you can create a shortcut on your desktop or your start menu for sqlnexus.exe.


The DataCollectors subfolder contains the data collector files. There is one ZIP file for each version of SQL Server. In our example, we want to monitor a SQL Server 2012 instance, so we need to uncompress the PerfStatsScript2012.zip file. Once uncompressed, you will see 3 CMD files and their accompanying XML configuration files.
  1. StartSQLDiagTrace2012.cmd & SQLDiagPerfStats_Trace2012.XML
  2. StartSQLDiagDetailed_Trace2012.cmd & SQLDiagPerfStats_Detailed_Trace2012.XML
  3. StartSQLDiagForReplay2012.cmd & SQLDiagReplay2012.XML
StartSQLDiagTrace2012.cmd will likely be the batch file you will run most often. By default, it will collect the most common Performance Monitor counters and run a SQL trace to capture batch level commands. The StartSQLDiagDetailed_Trace2012.cmd batch file will capture the same counters, but it will also capture statement level commands and the Showlan Statistics Profile. The StartSQLDiagForReplay2012.cmd batch file captures the trace events needed to replay it against another server.

Collecting Data
To monitor our server, copy the PerfStatsScript2012 subfolder to the SQL Server. This folder cannot be on a network drive; it must be local to that server. It’s best if you do not place it on the C drive or on a drive that hosts your transaction log (LDF) files. The data collector can quickly capture a lot of data, so you want to avoid filling up the C drive or impacting the write performance of your transaction log files. Open a command prompt to that folder location and run StartSQLDiagTrace2012.cmd. SQLDiag will start up the collectors based on what’s in the XML configuration file. Once you see the green line that says “SQLDIAG Collection started”, then you can try to reproduce your performance problem on the server.


Once you are done, just press Ctrl+C to shut down the data collector. Sometimes it will take several minutes for the collector to fully shutdown, so be patient and do not press Ctrl+C more than once.

You can leave the data collector running for a period of time, but please keep in mind that it can collect a lot of data and the SQL trace can potentially impact your performance. It’s usually best to start it, reproduce your performance issue, and then shut down the data collector.

After you stop the data collector, you will see a sub folder called SQLDiagOutput. Copy that entire folder back to your workstation to begin the analysis of the data.

Analysis of the Data
Run sqlnexus.exe using the shortcut you placed on your desktop. The first step is to specify which SQL Server will be used to perform the analysis. Enter the name of your SQL Server and click Connect.


The tool will automatically create a sqlnexus database on that SQL Server.


Now we need to import the data we collected. In the bottom left hand pane, click Import.


Choose the location of the SQLDiagOutput folder and then click the green Import button. If the collector captured data for more than one instance on the monitored server, then you will get a popup window asking which instance you want to analyze. Choose your instance and click OK.


Depending on how much data was collected, the import process could take a while; maybe even several hours. Be patient and just give it time to complete. While it’s running the Import button will change to a red Stop button. Once it’s complete, it will turn back to a green import button.


Now just close the Data Import window. In the SQL Nexus window, click SQL Perf Main from the upper left hand pane. This is main page where we will drill into the various reports.


Each report name that appears in blue is a hyperlink to that report. Report names that are in black did not have any data to analyze. Most reports have a summary of what they display, but some do not, like the Bottleneck Analysis report. It shows CPU utilization by SQL Server (yellow) and everything else (purple). If CPU utilization is higher for purple, then you could assume the CPU is being used by a process other than SQL Server.


If SQL Server is the higher consumer of CPU (yellow), then look further down on that page to see the wait stats analysis. This is the waits that accumulated while the data collector was running. This will help guide you toward what SQL Server was waiting on while executing the queries. You can click on each wait type to see more details about each wait. If you need to the definition of a wait stat, then look at Books Online.

To go back to the previous page in a report, just click the blue left arrow in the toolbar.


The Perfmon Summary report shows an aggregation of the counters collected from Performance Monitor. They are broken out by CPU, IO, Memory, and Network.


You can click on each blue link to get the graphical view. For example, in the IO report details you can see the Avg Disk Sec/Read and the Avg Disk Sec/Write which will show you how fast your IO subsystem is responding to requests.


The ReadTrace Report is really my favorite group of reports. The main report gives you a graphical view of the overall utilization of resources.


From here, you can drill into the data from various points, such as application name, database id, or login name. The Unique Batches report will show you the top TSQL batches by CPU, reads, writes, and duration. Each graph is inverted, so the one on the bottom is the largest consumer of that resource.


On the Y axis of each graph you will see a number. That number corresponds to the TSQL batch command that is listed further down on the page. For example, Query #1 was the largest consumer of reads. From that table, I can see that was a stored procedure named “SLEV”.


You can click on each batch to get even more detail about it in a graphical view over time.


Below the chart, you can click the + button next to “View Chart Details” to get the detailed info about that TSQL batch. This will display the number executions, CPU, reads, and writes, broken out by interval.


There are many more reports, so be sure to click through each one to view the information they provide.

Customize the Data Collector
By default, the data collectors will capture only a subset of perfmon counters and SQL trace events, and it will do that for ALL instances on the server being monitored. If you need to add or remove certain counters or monitor only a specific SQL Server instance, then you will need to edit the SQLDiagPerfStats_Trace2012.XML configuration file. You can open the file in Notepad, but opening it in SQL Server Management Studio color codes it and make everything easier to read.

The top section of the XML file is for the perfmon stats, which takes up about 75% of the file. The bottom section is for the SQL Server trace events. All of the possible options are listed for every counter; however, the majority are set to disable. Therefore, to add additional counters, just search for the counter name and set the “enabled” value to “true”. For example, if you wanted to add the TSQL:StmtStarting and TSQL:StmtCompleted, then just scroll down to about line 2775 and change the enabled value to “true” and save the XML file. Now when you run the collector it will also collect those two trace events.

If you need to set the name of the server then about line 7 you will see Machine name=".". Change the "." to the actual server name. If the server being monitored is a Failover Cluster Instance, then you must enter the SQL Server Virtual Server Name.


If you need to set the SQL Server instance name, then about line 2564 you will see Instance name="*". Change the "*" to the instance name. Only type the instance name here, not the ServerName\InstanceName. If your instance to monitor is the default instance, then enter "MSSQLSERVER".


Also on the same line, the default authentication to connect to that instance of SQL Server is Windows Authentacation. If you need to use SQL Server Authentication, then set windowsauth to “false” and user to the sql server login name. When you run the StartSQLDiagTrace2012.cmd batch file, it will prompt you to enter the password for that account.

Other Hints and Tricks
Before collecting the data, you need to make sure the Windows account is a member of the local administrators group a member of the sysadmin server role for the server you want to monitor. If you use a SQL Server login to collect the SQL trace events, then it also has to be a member of the sysadmin server role.

Once the data collector is started on the monitored server, don’t log off. That will shut down the collectors and you will have to restart them again.

If you cannot stay logged into the server, then you’ll need to schedule the collection by modifying the StartSQLDiagTrace2012.cmd batch file using the /B and /E parameters for SQLDIAG or register it as a Windows service. Books Online has more information about those options.

When you import data into SQL Nexus, it populates the tables in the sqlnexus database. If you already have data in the sqlnexus database, you’ll get the following error when attempting to import new data.


At this point, you will need to do one of two things: overwrite the existing data or create another sqlnexus database. To overwrite the existing database, click the Import link and then click Options. In the dropdown menu, just select “Drop Current DB Before Importing”. This will drop and recreate the sqlnexus database.


Keep in mind, sqlnexus is just another database on a SQL Server. If you want to keep that data for later analysis, you CAN backup that database before overwriting, or you can create a new database. Before clicking the Import link, click the database dropdown list on the tool bar. From there, you can select “<New Database>”. This just creates another database on your local SQL Server and will be the target of the imported data.


This is the way to go if you need to analyze data from multiple servers, because you can use the dropdown database list to change to a different sqlnexus database and view the reports.

Report Parameters is another feature that people tend to overlook. When viewing a report, such as the IO Metrics, click Parameters button on the toolbar. In the popup window, you can change the start and end timeframe that you want to view. This is extremely helpful if your data spans hours or even days.


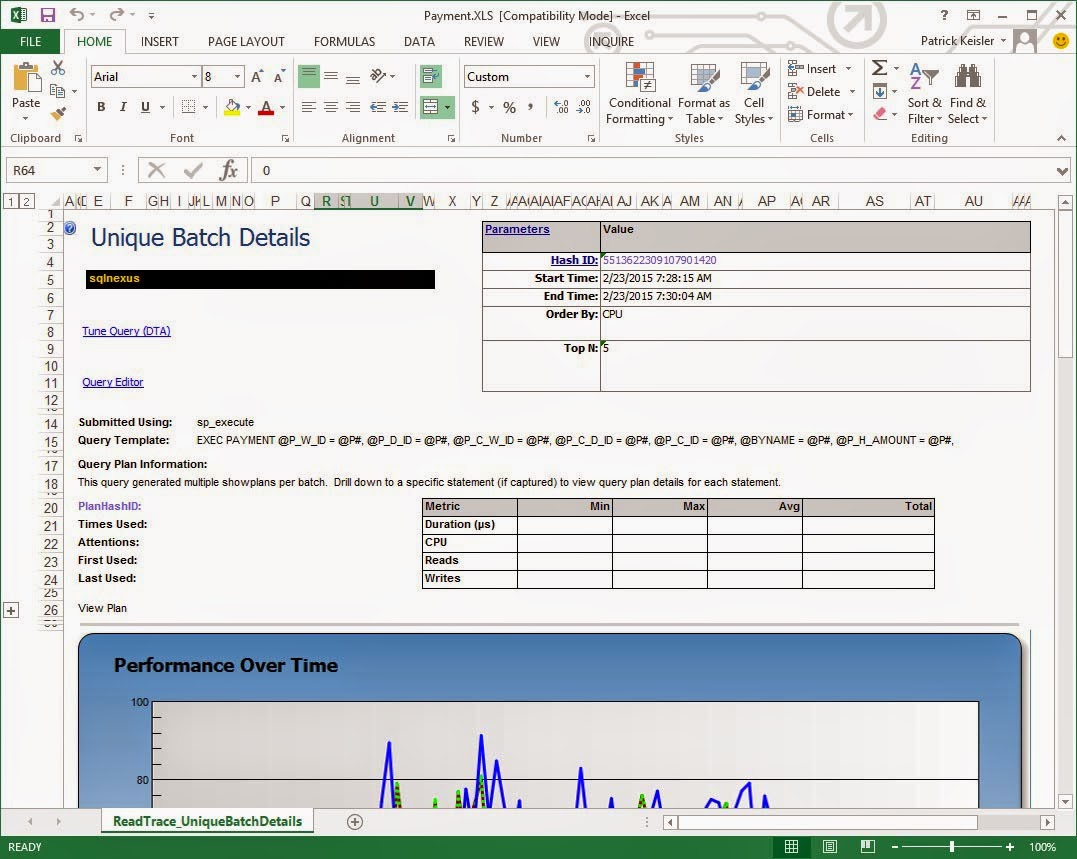
Finally, you can export the reports to an Excel file by clicking the Save button on the toolbar.


For example, through your analysis you find the offending query; you can export the batch details report to an Excel file and share that report with the development team or other DBA team members.


Conclusion
As you can see, SQL Nexus can be a very powerful tool to help troubleshoot performance issues within SQL Server. This is why the tool is widely used internally be various SQL Server support teams. The best way for you to get more info is to practice collecting and analyzing data from your servers. However, be sure that you practice on a TEST server and not in your production environment. Soon you’ll be able to quickly diagnose and resolve performance issues in your environment. And one day, it might just save your bacon!